What Is Email Authentication, and Why Does It Matter?
Email continues to be one of the most reliable and widely used methods for professional communication. But simply hitting "send" isn't enough to ensure your message reaches its destination. Without proper email authentication, even legitimate emails can be flagged as spam or rejected altogether.
Email delivery depends on more than just good content; it relies heavily on trust. Internet Service Providers (ISPs) and mailbox providers use authentication protocols to verify that emails are sent from genuine sources. If these checks fail, your message may never reach the inbox.
Why 2024 Changed Everything
If you've been sending emails for a while, you might remember when authentication was a "nice to have." Those days are over. In 2024, Gmail and Yahoo rolled out new requirements for bulk senders that made authentication non-negotiable.
Here's what changed:
- Senders of 5,000+ emails per day to Gmail addresses must have DMARC set up
- SPF or DKIM is required for all senders — no exceptions
- Emails must align with proper domain verification
- TLS encryption is strongly recommended
And it's not just big senders who benefit. According to Mailgun's State of Deliverability report, 79% of senders updated their authentication setup after these new rules were announced. The message is clear: if you want your emails in the inbox, you need to be authenticated.
At Aurora SendCloud, we've seen firsthand how these changes have impacted our customers. Teams that had been putting off authentication suddenly found themselves struggling with deliverability issues. The good news? Getting set up isn't as hard as it sounds — and we're here to walk you through it.
This article discusses what email authentication means, why it's important and how businesses can set it up easily. You'll also learn how Aurora SendCloud simplifies the process, helping you boost inbox placement while protecting your brand. Read on to learn more.
What Is Email Authentication?
Email authentication is a set of technical tools that help prove an email sender is who they say they are. Think of it like ID verification for your emails. Without it, your emails could get flagged as spam or even blocked altogether. Nobody wants that, right?
Here are the three key methods that do the work:
- SPF (Sender Policy Framework): Verifies which mail servers can send on behalf of your domain.
- DKIM (DomainKeys Identified Mail): Adds a digital signature to your messages to prove they haven't been tampered with.
- DMARC (Domain-based Message Authentication, Reporting, and Conformance): Works with SPF and DKIM to give domain owners control over unauthenticated messages.
A bonus player? BIMI (Brand Indicators for Message Identification) lets brands show their logo next to authenticated emails in supported inboxes.
In Simple Words?
- SPF: Is this email coming from a legit server?
- DKIM: Has the email been altered?
- DMARC: What should we do if SPF or DKIM fails?
When used together, these protocols improve email delivery, secure your brand, and keep phishers at bay.
What Major Mailbox Providers Expect
Different email platforms have their own rules for email authentication — and let's be honest, skipping them isn't an option anymore. If your messages aren't appropriately authenticated, they may never reach your recipient's inbox.
Gmail (Google)
- SPF or DKIM must be set up for all senders. No exceptions.
- DMARC is mandatory for bulk senders (5,000+ emails/day to Gmail)
- Emails must align with proper domain verification
- TLS encryption is recommended
Yahoo (Ymail, AOL)
- Proper setup of SPF, DKIM, and DMARC
- "From" domain must align with authenticated domain
- Clean sending practices matter
Outlook / Microsoft 365
- SPF and DKIM must both be configured
- At least one must align with From domain for DMARC
- DMARC not optional for high-volume senders
- Microsoft recommends TLS and BIMI where supported
Bottom line? No matter the platform, authentication is non-negotiable.
What Are the Benefits of Email Authentication?
You wouldn't open the door to a stranger without ID, would you? The same goes for email providers. Email authentication offers benefits across the board for senders, mailbox providers and recipients.
For Email Senders
Email authentication is your passport to the inbox. Here's how it helps you as a sender:
- Higher inbox placement: Emails with valid authentication are far more likely to reach your customer's main inbox rather than their spam folder.
- Improved brand trust: When your emails are consistently verified, they signal legitimacy.
- Better sender reputation: ISPs use reputation scores to decide whether to deliver your emails.
- Fewer bounces: Authentication minimises the chances of your emails being rejected.
For Mailbox Providers
Mailbox providers like Gmail, Outlook, and Yahoo handle billions of emails daily. They need to filter out the junk and deliver what matters:
- Stronger spam filtering: It helps providers distinguish between real senders and impersonators.
- Reduced junk traffic: Spam and phishing emails often lack proper authentication.
- Platform credibility: Keeping their users safe builds long-term trust.
For Recipients
The benefits extend right to the end user:
- Fewer phishing scams: Authentication protocols act like ID checks at the door.
- Trusted brand visuals: With full authentication (including BIMI), senders can display brand logos directly in the inbox.
See the Bigger Picture
Email authentication is more than a technical step; it's a win for everyone. Whether you are a marketer, IT lead, or a small business owner, investing in proper authentication ensures:
- Smoother email delivery
- Higher sender reputation
- Stronger user protection
- A more trusted email ecosystem
Ready to dive deeper? Now you know what email authentication is and why it matters. Let's break down all the methods you need to understand — from the basics you already heard about to advanced standards that will take your email program to the next level. We'll start with the core three, then add four more that separate the pros from the rest.
The 7 Email Authentication Methods You Need to Know
You already got the quick overview of SPF, DKIM, and DMARC earlier. Now let's dig into each method in detail — including four advanced ones you might not have heard of yet.
Before we jump in, here's a quick cheat sheet so you can see what you're dealing with at a glance:
| Method | What it does | How hard is it? | Do I need it? |
|---|---|---|---|
| SPF | Checks if the sending server is allowed | Easy | Yep, it's essential |
| DKIM | Adds a digital signature to your emails | Medium | Absolutely — non-negotiable now |
| DMARC | Tells providers what to do with failed emails | Medium | High priority (and required for bulk senders) |
| TLS | Encrypts emails while they travel | Easy | Recommended for everyone |
| BIMI | Shows your brand logo in the inbox | Hard | Optional, but great for brand recognition |
| MTA-STS & DANE | Forces TLS connections so they can't be downgraded | Hard | Advanced — for high-security industries |
| ARC | Keeps forwarded emails from going to spam | Medium | Advanced — good if you use mailing lists |
Let's start with the basics, then move to the advanced stuff.
1. SPF: The Foundation
SPF (Sender Policy Framework) is like a guest list for your domain. It tells receiving servers which mail servers are allowed to send emails on your behalf.
How it works: You create a TXT record in your DNS that lists all the IP addresses or domains of your authorized senders. When someone receives an email from you, their server checks this list. If the sending server is on the list, SPF passes. If not, it fails.
Why it matters: SPF is the first line of defense against spoofing. It's simple to set up and provides immediate protection.
Common mistake we see: Forgetting to include third-party services. If you use Mailchimp, HubSpot, or any other tool that sends emails for you, they need to be in your SPF record.
Learn more: Complete SPF Record Guide
2. DKIM: The Digital Signature
DKIM (DomainKeys Identified Mail) adds a digital signature to your emails. Think of it like a wax seal on a letter — if the seal is intact when it arrives, you know nobody opened it.
How it works: When you send an email, your server signs it with a private key. The public key is published in your DNS. When the recipient gets the email, they use the public key to verify the signature. If it matches, DKIM passes.
Why it matters: DKIM proves that your email hasn't been altered in transit. Even if someone intercepts it, they can't change the content without breaking the signature.
Pro tip: Use 2048-bit keys instead of 1024-bit. It's more secure and most providers support it now.
Learn more: Complete DKIM Records Guide
3. DMARC: The Enforcer (with Alignment!)
DMARC (Domain-based Message Authentication, Reporting, and Conformance) is what ties SPF and DKIM together. It tells receiving servers what to do when authentication fails — and sends you reports so you can see what's happening.
How it works: You publish a DMARC record that specifies:
- p=none: Monitor only (great for getting started)
- p=quarantine: Send failed emails to spam
- p=reject: Block failed emails completely
The secret sauce: Alignment
Here's a common gotcha we see all the time: SPF and DKIM pass, but DMARC still fails. Why? Because of alignment.
Alignment checks whether the domain in your "From" address matches the domain that passed SPF or DKIM. For example:
- If your From is newsletter@yourcompany.com
- But SPF passes for bounce.youresp.com
- They don't align — so DMARC fails
Fix: Use custom DKIM keys on your domain and set up a custom return-path. Most ESPs make this easy, including Aurora SendCloud.
Why alignment matters: It prevents attackers from using a legitimate server to send spoofed emails with a fake From address.
Learn more: Complete DMARC Records Guide — including our deep dive on alignment.
4. TLS: The Encryption
TLS (Transport Layer Security) encrypts your email as it travels between servers. Without TLS, emails are like postcards — anyone along the way can read them.
How it works: When your server connects to a recipient's server, they negotiate an encrypted connection. If both support TLS, the email travels securely.
Why it matters: TLS protects sensitive information in transit. Plus, email providers like Gmail prefer encrypted connections — it's another trust signal.
Quick tip: Make sure your sending platform uses TLS 1.2 or higher. Older versions are less secure.
Learn more: TLS Encryption Guide
5. BIMI: The Visual Trust Signal
BIMI (Brand Indicators for Message Identification) lets you display your brand logo next to authenticated emails in supported inboxes. It's like putting your verified badge front and center.
How it works: BIMI requires DMARC at p=reject plus a Verified Mark Certificate (VMC) that proves you own your logo. You publish a BIMI record in your DNS, and supported inboxes show your logo.
Why it matters: BIMI boosts open rates by 10-39% according to industry data from BIMI Group and helps recipients recognize your emails instantly. It's also a powerful anti-phishing tool — scammers can't display your logo without proper authentication.
Is it worth the investment? For most businesses, yes — especially if you send a lot of emails. The VMC costs around $1,000-$1,500/year, but the lift in engagement often pays for itself.
Learn more: BIMI Brand Recognition Guide
6. MTA-STS & DANE: Advanced TLS Enforcement
STARTTLS is great, but it has a weakness: attackers can trick servers into sending emails without encryption. MTA-STS and DANE fix that.
What they do:
- MTA-STS publishes a policy telling senders "only deliver over TLS." If TLS fails, the email is refused.
- DANE uses DNSSEC to verify certificates directly, bypassing traditional certificate authorities.
Why they matter: For high-security industries like finance or healthcare, these are essential. They prevent downgrade attacks and man-in-the-middle threats.
Do you need them? Most businesses can start with regular TLS. MTA-STS and DANE are advanced features for when you're ready to level up your security.
Learn more: MTA-STS Deep Dive in TLS Guide
7. ARC: Fixing Forwarded Emails
Ever wondered why forwarded emails sometimes go to spam? ARC (Authenticated Received Chain) fixes that.
How it works: When an email passes through forwarders (like mailing lists or email clients), intermediate servers add ARC headers that preserve the original authentication results. This way, even if SPF fails because the forwarding server isn't on your list, the original authentication is still recognized.
Why it matters: Forwarding is common, especially with mailing lists. ARC ensures legitimate forwarded emails don't get penalized.
Best for: Businesses that use mailing lists or have customers who frequently forward emails.
The Complete Setup Checklist (12 Steps, 3 Phases)
Let's get practical. Here's our step-by-step checklist to get you fully authenticated. We've broken it into three phases so you can start small and build from there.
Before you start: Grab your DNS provider login, a list of all services that send emails for your domain, and a cup of coffee. This is going to be straightforward, I promise.
Phase 1: Foundation (Essential — Do This First)
These are the basics. You need these before anything else.
Step 1: Set up your MX records
- Point your MX records to your email provider
- Double-check that you have secondary MX records for redundancy
Learn more: MX Records Guide
Step 2: Configure your SPF record
- List every service that sends emails for your domain
- Keep it under 10 DNS lookups (that's a hard limit!)
- Use -all or ~all at the end, never +all
Learn more: SPF Record Guide
Step 3: Generate and publish DKIM keys
- Use 2048-bit keys for better security
- Publish the public key as a TXT record in your DNS
- Test it by sending an email and checking the DKIM header
Learn more: DKIM Records Guide
Step 4: Enable TLS
- Make sure your sending platform uses TLS 1.2 or higher
- Check your delivery logs to confirm it's working
Learn more: TLS Encryption Guide
You're done with Phase 1! Pat yourself on the back — you've got the basics covered.
Phase 2: Enforcement (Recommended — Do This Quarter)
This is where you go from "having authentication" to "being protected."
Step 5: Start with DMARC monitoring
- Publish a DMARC record with p=none (monitor mode)
- Set up aggregate reporting (rua=mailto:your-dmarc@address.com)
Learn more: DMARC Records Guide
Step 6: Review DMARC reports for 2-4 weeks
- Use a tool like DMARC Analyzer to read the XML reports
- Look for senders you don't recognize
- Check your alignment rate (aim for 95%+)
Step 7: Fix alignment issues
- If alignment is low, set up custom DKIM and return-path
- Work with your ESP to make sure they're using your domain for signing
Deep dive: DMARC Alignment Guide
Step 8: Gradually move to enforcement
- Start with p=quarantine and a low percentage (pct=10)
- Monitor for false positives
- After a few weeks, increase the percentage to 100%
- Once everything is stable, move to p=reject
Phase 2 complete! Your domain is now protected against spoofing.
Phase 3: Advanced (Optional — High Impact)
These are the finishing touches that set top-tier senders apart.
Step 9: Set up BIMI
- Get a VMC certificate
- Create an SVG Tiny logo
- Publish your BIMI DNS record
Learn more: BIMI Guide
Step 10: Implement MTA-STS
- Publish an MTA-STS policy file
- Add the DNS record
- Set up TLS-RPT reporting
Learn more: MTA-STS Setup
Step 11: Configure subdomain authentication
- If you send from subdomains (like marketing.yourdomain.com), set up separate auth for each
- Use DMARC's sp= tag to apply policy to subdomains
Step 12: Set up DKIM key rotation
- Schedule rotation every 6-12 months
- Keep old keys active for a week after rotating (to avoid delivery issues)
You're a pro! You've got enterprise-level email authentication.
Quick Win: 3-Minute Check
Don't have time for the full checklist? Run these three quick checks:
- Send an email to Gmail → "Show original" → Look for SPF/DKIM/DMARC "PASS"
- Run your domain through MXToolbox's SPF check
- Check if you have a DMARC record at _dmarc.yourdomain.com
How to Verify Your Authentication Is Working
Did your email pass the test? Here's how to check using Gmail — no rocket science involved.
Step-by-Step Check:
- Send a test email to any Gmail address.
- Open the message, and click the three-dot menu (More) in the top right.
- Click "Show original."
- Look for "PASS" next to SPF, DKIM, and DMARC.
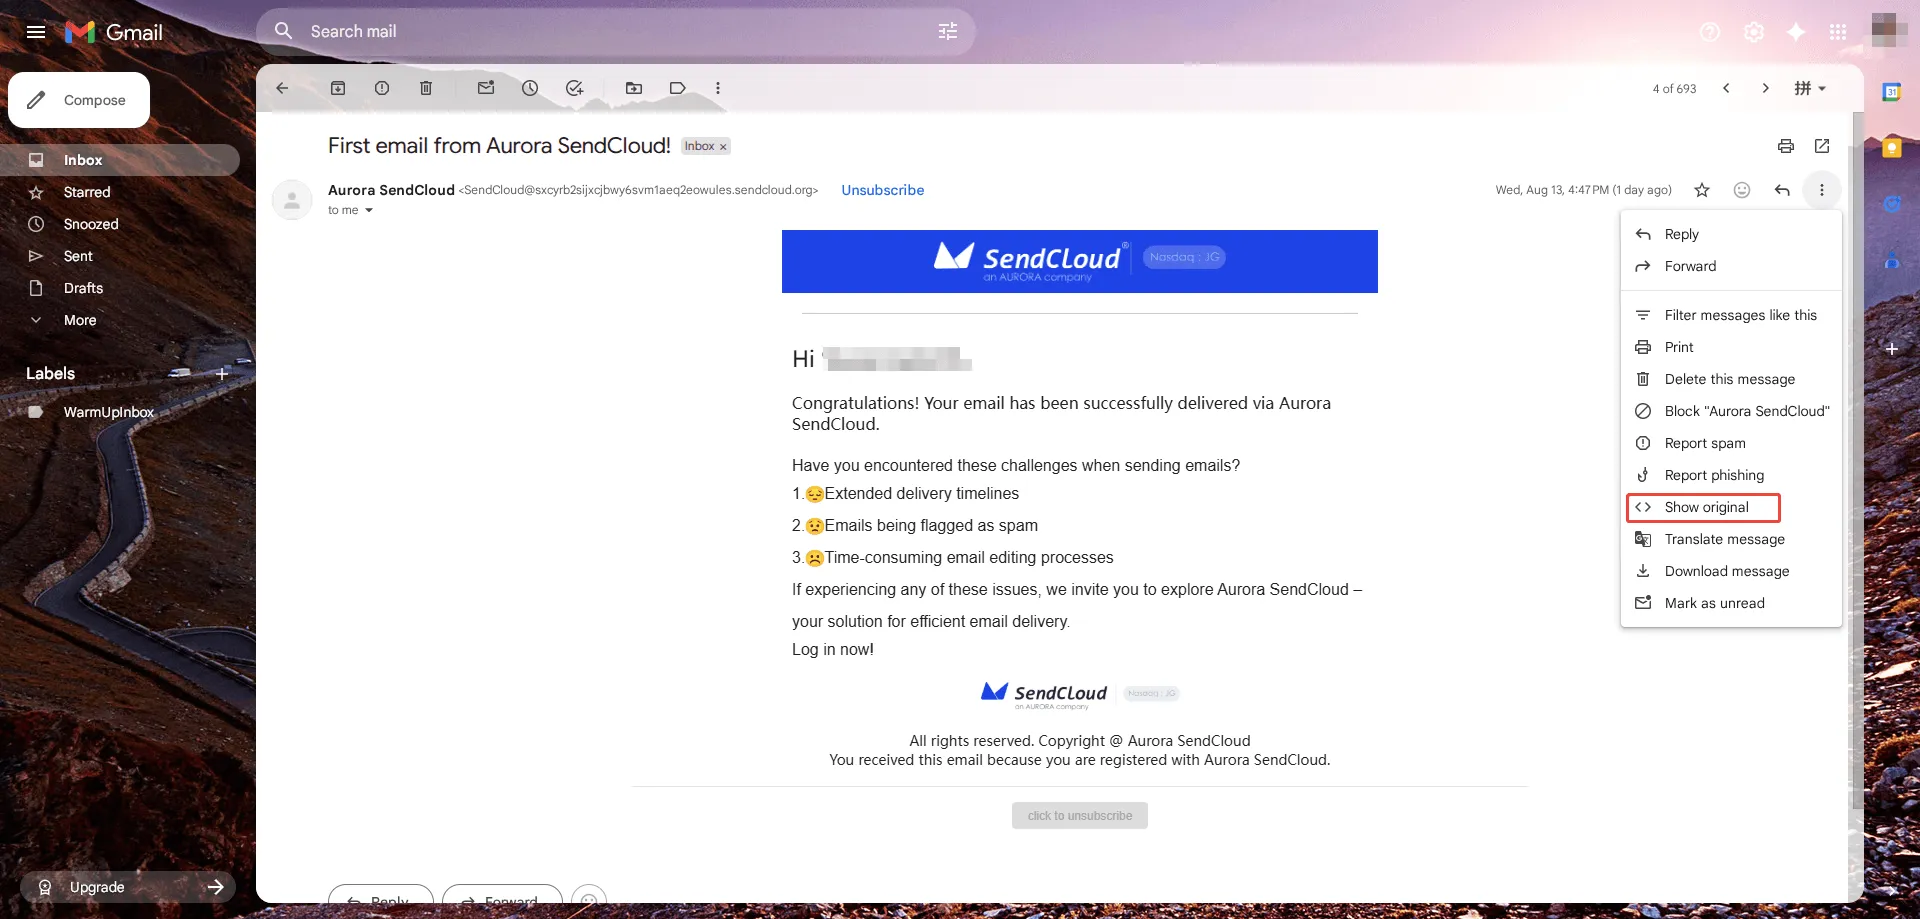
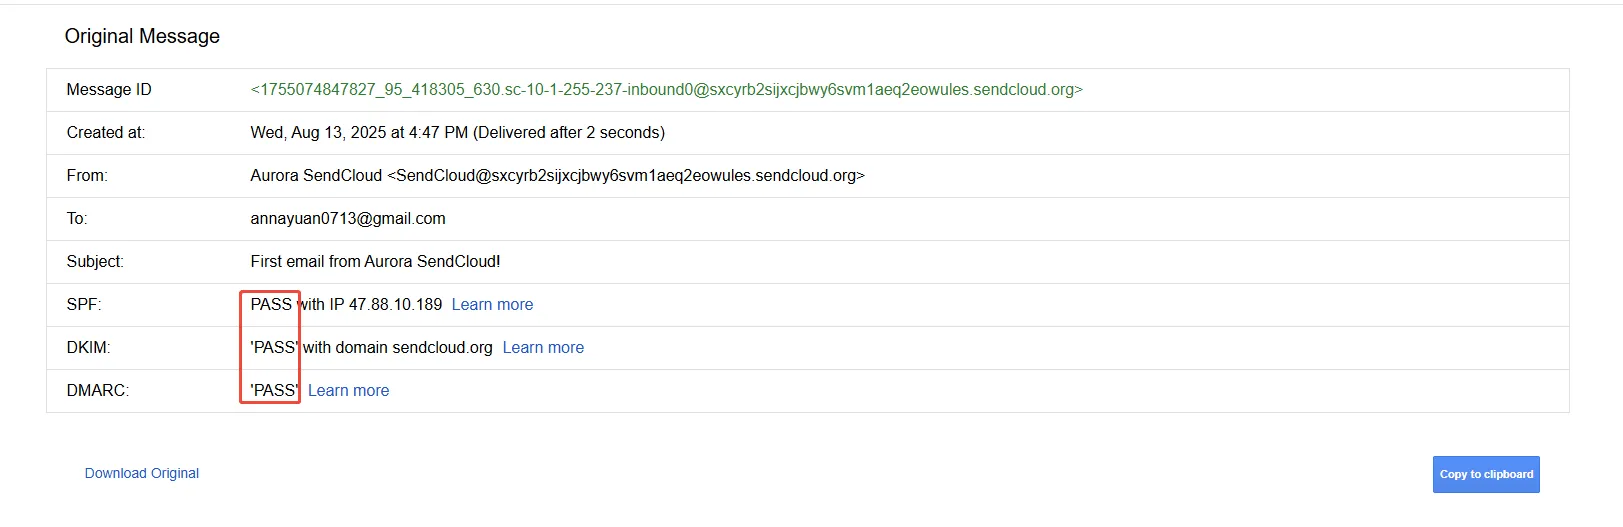
If all three say PASS, congrats! Your setup is working like a charm. If not? It's time to review your DNS records or use a tool like Aurora SendCloud to fix the issue fast.
More Tools to Verify Your Setup
Gmail's "Show original" is great for a quick check, but here are some other tools we recommend:
- MXToolbox: Quick DNS lookups for SPF, DKIM, DMARC, and MX records
- DMARC Analyzer: Turns raw XML reports into readable charts
- EasyDMARC: Full authentication audit with actionable insights
Pro tip: Look for the Authentication-Results header in your email. It tells you exactly what passed or failed.
Common Mistakes & How to Fix Them
Let's be real — we all make mistakes. Here are the ones we see most often, and how to fix them fast.
SPF Mistakes
- Too many DNS lookups: Flatten your SPF record or remove unused services. The limit is 10.
- Missing third-party senders: Add them to your SPF record! Even one missing sender can cause issues.
- Using +all: That means "allow everyone" — never do this. Use -all or ~all instead.
DKIM Mistakes
- Wrong selector name: Double-check that your selector matches what your ESP is using.
- Key too short: Upgrade to 2048-bit keys. 1024-bit is outdated.
- DNS propagation delay: Wait 24-48 hours after updating records — DNS changes take time.
DMARC Mistakes
- Jumping straight to p=reject: Start with p=none, then p=quarantine, then p=reject. Rushing this will block legitimate email.
- Not checking reports: Reports tell you exactly what's wrong — read them!
- Alignment issues: Set up custom DKIM and return-path. Most ESPs do this with a few clicks.
Where Do You Stand? The Email Authentication Maturity Model
Wondering how your setup compares? Use this simple maturity model to assess your current level.
Level 0: Unauthenticated
- No SPF, no DKIM, no DMARC
- Risk: Critical — your domain is wide open to spoofing
- Next step: Set up SPF + DKIM this week
Level 1: Basic
- SPF + DKIM set up
- Risk: High — you have basic protection but no enforcement
- Next step: Add DMARC at p=none
Level 2: Monitored
- DMARC at p=none, reviewing reports
- Risk: Medium — you're monitoring but not enforcing
- Next step: Fix alignment issues and move to p=quarantine
Level 3: Protected
- DMARC at p=quarantine or p=reject
- Risk: Low — your domain is protected against spoofing
- Next step: Add BIMI or MTA-STS
Level 4: Optimized
- Full stack: BIMI + MTA-STS + ARC + key rotation
- Risk: Very low — enterprise-level security
- Next step: Maintain and monitor regularly
What level are you? Take 30 seconds to find out. Then pick one next step and do it this week.
Authentication & Deliverability: The Connection
Best Practices to Keep Your Authentication Strong
Let's be honest — setting up authentication is just the beginning. Keeping it working takes regular care. Follow these best practices:
- Use dedicated sending domains: Keeps your main domain safe if something goes wrong with marketing emails.
- Audit your DNS records quarterly: Catch issues early before they cause delivery problems.
- Segment by subdomains: Separate transactional from marketing emails. Each gets its own reputation.
- Avoid using free domains: Always use your own branded domain.
- Monitor performance reports: Keep an eye on bounces, complaints, and spam placement.
Does Authentication Guarantee Inbox Placement?
Here's the truth: Authentication is necessary, but it's not sufficient. Think of it like this:
- Authentication = your ticket to get in the door
- Content and engagement = whether you get a good seat
ISPs use authentication as a baseline trust signal. Without it, you're starting from a deficit. With it, you've met the minimum bar — then your content quality, list hygiene, and engagement rates take over.
At Aurora SendCloud, we've seen teams with perfect authentication still struggle with deliverability because their lists are outdated or their content triggers spam filters. Authentication is the foundation, but you need to build on it.
Different Industries, Different Needs
Not every business needs the same level of authentication:
- E-commerce: SPF + DKIM + DMARC at p=quarantine = solid foundation
- SaaS: DMARC at p=reject + subdomain auth
- Finance/Healthcare: Full stack — DMARC reject + MTA-STS + TLS enforced
How Aurora SendCloud Makes Authentication Easy
Setting up email authentication manually can feel overwhelming. We get it — that's why we built Aurora SendCloud to simplify the process.
Here's how we help:
One-Click Setup
We automatically generate the DNS records you need for SPF, DKIM, and DMARC. Just copy-paste them into your DNS provider. No guesswork, no syntax errors.
Real-Time Monitoring
We alert you when something's off — like a DKIM key expiring or an SPF lookup limit issue — so you can fix it before it affects delivery.
DMARC Reports Made Readable
Raw XML reports are impossible to read. We turn them into clear charts showing who's sending as your domain, what's passing, and what's failing.
Expert Support
Stuck on a tricky setup? Our deliverability team is here to help. We've helped thousands of teams get authenticated — we've seen it all.
The best part? Most Aurora SendCloud customers get fully authenticated in under 10 minutes.
Frequently Asked Questions
Q: What's the most important authentication method?
A: If I had to pick one, it's DMARC. SPF and DKIM are essential, but DMARC is what actually enforces policies and protects your brand.
Q: How long does full setup take?
A: The basics (SPF + DKIM + TLS) take 30-60 minutes. Getting to DMARC p=reject takes 2-4 weeks because you need to monitor reports first.
Q: Do I need a developer?
A: For basic setup, probably not. Most DNS providers have user-friendly interfaces. For advanced setups like MTA-STS, you might want IT help. Aurora SendCloud customers get guided support.
Q: Why is my email still in spam with authentication?
A: Authentication gets you in the door, but content quality, list hygiene, and engagement matter too. Check your sender reputation and list health. Read our guide on why Gmail blocks emails for more insights.
Q: Do I need to authenticate every domain?
A: Yes! Every domain and subdomain that sends email needs its own authentication setup.
Further Learning Resources
Looking to dive deeper? Here are our most helpful guides:
Core Protocols
- SPF Record Setup Guide — Everything about SPF
- DKIM Records Security Guide — Step-by-step DKIM setup
- DMARC Records Guide — From monitoring to enforcement
- BIMI Brand Recognition Guide — Get your logo in the inbox
Infrastructure & Security
- TLS Encryption Guide (+MTA-STS) — Encrypt your email
- MX Records Guide — Understanding email routing
- SMTP Ports Guide — Which ports to use
Tools & References
- Email Header Guide — Read headers like a pro
- 5 Free Authentication Methods — Quick overview
Related Topics
- Complete Email Deliverability Guide — The full picture
- Sender Reputation First Aid — Fix your reputation
- Why Gmail Blocks Emails — Understand Gmail's filters
Final Thoughts
Email authentication isn't just a technical detail — it's the foundation of secure and successful email delivery. With protocols like SPF, DKIM, and DMARC, senders can prove they're legitimate, protect their brand identity, and improve inbox placement across major platforms.
The good news? Verifying your setup doesn't have to be complicated. Start with Phase 1 of the checklist, work your way up through the maturity levels, and don't try to do everything at once.
As spam filters become more advanced with AI, only well-authenticated senders will stay visible in the inbox. So don't wait — secure your emails the smart way.
Ready to get started? Go back to the checklist and begin Phase 1 today. Even just getting SPF and DKIM set up makes a huge difference.